
The craziest hack: Install Linux on an 8-bit Nintendo NES
Emulation has made it possible to achieve things that once seemed impossible, and NES86 is without a doubt one of the most fascinating projects we’ve seen lately. It’s an extremely stripped-down version of the Linux kernel that runs on a Nintendo NES console—something that, as you can imagine, was made possible thanks to emulation.
Behind this project is "decrazyo," a programmer who has shared all the details in a video that tech enthusiasts will love. To understand the complexity of this project, you have to consider that the NES has much more modest specs than any PC from that era capable of running Linux. Its CPU, an 8-bit Ricoh 2A03 running at 1.79 MHz, is far weaker than something like the IBM 5150, which had a 16-bit processor at 4.77 MHz and could handle nearly twice as many instructions. Still, the two share some similarities that made this project possible through emulation.
Essentially, "decrazyo" created an emulator for an IBM 5150 PC that runs on an NES—a huge challenge since it involves emulating a more powerful system on much weaker hardware. This project, though different from NES-OS, is just as impressive.
One of the biggest hurdles was the processor, but memory was also a major challenge. The project relies on ELKS (Embeddable Linux Kernel Subset), a minimal version of Linux that uses very few resources. Even though ELKS only needs 128 KB of RAM, that’s a massive amount for the NES, which only has 2 KB of memory.
How did they manage to run Linux on an NES with just 2 KB of RAM?
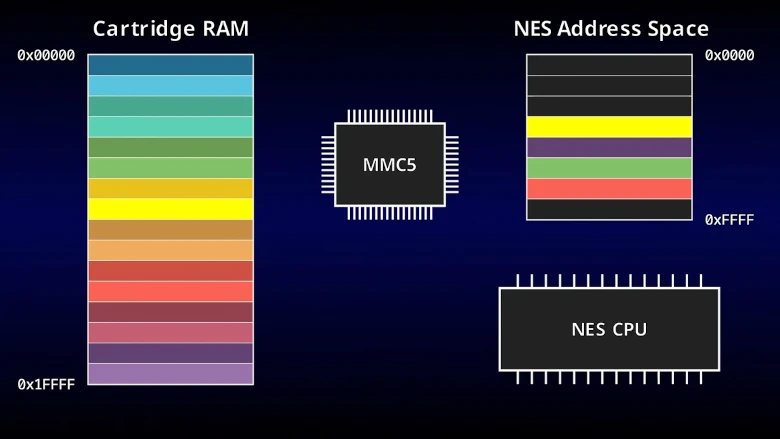
To overcome this limitation, they used a mapper chip, which ensures only a small portion of a cartridge’s memory is visible at any given time. This technique, known as memory bank switching, lets the CPU choose which part of the memory it wants to use. The NES can handle up to 1 MB of ROM in a cartridge—more than enough to store the emulator, the PC BIOS, the Linux kernel, the system file, and still have some free space. However, the real challenge was making Linux understand this memory system and present the RAM and ROM as a contiguous 20-bit memory space.
The CPU emulation process was broken down into four key phases: fetching, decoding, executing, and writing back. In the fetching phase, the address of the next instruction is calculated and copied into the cache. Decoding analyzes the instruction to determine its function and the values it works with. Execution carries out the necessary calculations, and writing back stores the result in its final location before repeating the cycle.

Despite the progress, the project became so complex that it couldn’t use a standard NES cartridge. Instead, "decrazyo" resorted to a clever "trick": hacking the built-in NES emulator in Animal Crossing. This process was extremely difficult due to the emulator’s memory limitations, but they eventually managed to overcome these obstacles.
The final result can be seen in the video: NES86, based on Linux, running inside an emulator within another NES emulator. As you’d expect, performance isn’t great. A good example is the Tetris demo, which in its simplest form (black and white) generates one frame every thirty seconds. Yes, you read that right—one frame every half minute!
This project is a testament to the ingenuity and creativity in the world of emulation, proving that even with limited hardware, boundaries can be pushed.
Leave a Reply