
TUTORIAL Batocera Linux: Turn Your PC into a Super Retro Gaming Console
Turn your MicroSD card, USB flash drive, or any other USB storage into a retro gaming console by plugging it into any computer.
What is Batocera?
Taken from the official website, Batocera (also known as Batocera.linux) is a completely free and open-source retro gaming distribution that can be copied to a USB drive or SD card. It’s designed to turn any computer or mini PC into a gaming console, either temporarily or permanently. Batocera.linux doesn’t require any modifications to your computer. Just keep in mind that you should own the games you use to stay within legal limits.
Reasons to Install Batocera
Of course, to play retro video games while taking your entertainment center with you on trips or visits. Just bring your USB drive, plug it into any computer, and you’ve got your retro gaming console ready.
Batocera supports (but isn’t limited to) the following consoles:
- 3DO
- Amiga
- Amstrad CPC
- MAME
- Neo Geo: MVS, Pocket, Pocket Color
- Nintendo NES, SNES, N64, GameCube, Wii, Game Boy, Game Boy Color, Game Boy Advance, DS, 3DS
- OpenBOR
- SEGA: SG1000, Master System, Genesis/Mega Drive, Sega CD, Sega 32x, Saturn, Dreamcast, Game Gear
- Sony PlayStation: PS1, PS2, and PS3
- Windows and DOS games
- ...and much more.
If you want the full and detailed list of all systems compatible with Batocera, check out the official compatibility list: https://batocera.org/compatibility.php
Prerequisites
Here’s what you’ll need and should prepare before moving forward with the installation:
- USB Storage
Any portable storage device—whether it’s a USB flash drive, MicroSD card, portable SSD, or external hard drive. At least 16GB of storage is recommended. However, if you plan to store a lot of games, you might want to go for 32GB to 128GB or even more. - MicroSD Card Reader (Optional)
This is only necessary if you’re using a MicroSD card and your computer or mini PC doesn’t have a built-in card reader.
For simplicity, throughout the rest of this article, no matter what portable storage you use (USB flash drive, MicroSD card, etc.), we’ll refer to it as a USB drive.
How to Install and Set Up Batocera
There are many ways to get it up and running, including detailed tweaks for each retro system or console. However, what I’m sharing here is the easiest and simplest way to install it.
The whole process took me between 30 and 60 minutes, depending on your internet speed (downloading all the necessary software) and your computer (flashing and booting the image).
The steps written here have been tested on:
- A Windows 11 PC (used to flash Batocera onto the USB drive).
- Batocera version 34 (or the latest at the time).
The steps may vary slightly if you use a different version of Batocera or a different operating system, but they shouldn’t be too different. If you have any questions or run into issues, feel free to leave them in the comments below, and I’ll be happy to help.
Step 1) Download the Batocera Image File to Your Computer
The latest Batocera version at the time of writing is v34. When I downloaded it, the file was named batocera-x86_64-34-20220523.img.gz and was 2.1GB in size. Since you might download a different version in the future, for simplicity, we’ll refer to the Batocera image file as Batocera.img.gz.
You can download it from the official link: https://batocera.org/download
Step 2) Download and Install Balena Etcher on Your Computer
To keep things simple, I recommend downloading the portable version. At the time of writing, the latest version of Balena Etcher Portable is 1.7.9, so the file I downloaded was named balenaEtcher-Portable-1.7.9.exe (123 MB). Since you might download a different version later, we’ll just call the installer BalenaEtcherPortable.exe.
Download link: https://www.balena.io/etcher/
Step 3) Connect Your USB Drive
Plug in your USB flash drive, MicroSD card, or any USB storage into your computer’s USB port. Make sure it’s detected and doesn’t have any important files on it—because the USB drive will be completely wiped.
Step 4) Run Balena Etcher and Start Flashing
Once Batocera is successfully downloaded, run BalenaEtcherPortable.exe as administrator by right-clicking on it and selecting "Run as administrator."
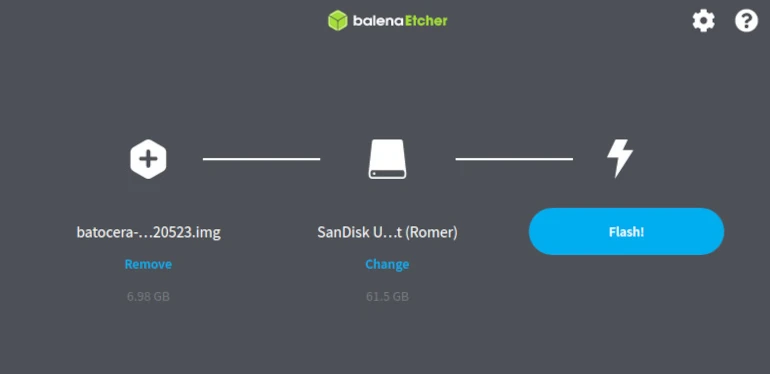
Once Balena Etcher is open, follow these steps:
a) On the left, click "Flash from Drive" and select the Batocera.img.gz file you just downloaded.
b) In the middle of the screen, click "Change" to select the USB drive/hard drive/SD card where you want to flash Batocera.
c) Then, on the right, click "Flash" to begin the process.
If flashing fails, adjust these settings on your computer:
a) Go to Windows > Start > Settings > Privacy & Security > Windows Security > Virus & Threat Protection.
b) In the Virus & Threat Protection window, scroll down until you find "Ransomware Protection" and click "Manage Ransomware Protection."
c) In the Ransomware Protection window, under "Controlled Folder Access," click "Allow an app through Controlled Folder Access."
d) In the "Allow an app through Controlled Folder Access" window, click "+ Add an allowed app."
e) Find and select BalenaEtcherPortable.exe (e.g., balenaEtcher-Portable-1.7.9.exe).
f) After adding it to the list, try flashing again.
Depending on your computer’s specs, the flashing (and verification) process may take between 10 and 30 minutes.
Once flashing is complete, you can safely remove the USB drive containing Batocera. For the rest of this article, we’ll refer to it as the Batocera USB drive.
Step 5) Connect the Batocera USB Drive
On the computer where you want to run Batocera, plug in the USB drive.
Make sure the computer is turned off—or if it’s the same computer you used for flashing, shut it down first.
Step 6) Boot the Computer with the Batocera USB Drive Connected
Start your computer and press Esc, Delete, F1, F8, or F12 (depending on your computer) to open the BIOS screen.
In the BIOS, change the boot order so that the computer boots from the USB drive first. Since every computer has a different BIOS and settings, these steps may vary slightly.
Exit the BIOS but make sure to save the settings after changing the boot order.
Now, your Batocera should boot up and install automatically. Time to play and have fun!

Leave a Reply